SimpliVity CLI basic commands
Hi all
During my SimpliVity PoC I created a lot of VMs, cloned and migrated them. It is much easier doing this task over the SimpliVity CLI. Here is a small guide – a 101 – for some basic tasks that during testing helped me a lot:
About the colors of the commands:
orange means fixed commands
green means values, you can change at your own needs
CLI Access
You can access the SimpliVity OmniStack Command Line Interface (CLI) in two ways:
Possibility 1 (SimpliVity user
| host: | IP / DNS name of the OVC (SimpliVity OmniStack Virtual Controller) |
| username: | svtcli |
| password: | simplicity |
| after login type: | svt-session-start |
Possibility 2 (vCenter credentials)
| host: | IP / DNS name of the OVC (SimpliVity OmniStack Virtual Controller) |
| username: | vCenter credentials (ex. administrator@vsphere.local) |
| password: | your password |
| after login type: | nothing is required to type (session is automatically started) |
List of all commands
- You can check the manual
- you can write svt- and hit tab
Useful commands
Here some useful commands during my PoC. (You can follow each after another)
Show all datastores
svt-datastore-show
Show all Backup Policies
svt-policy-show
Create a new backup policy
svt-policy-create -name backup4h
Create backup policy rule (every 4 hours with 5 days of retention)
svt-policy-rule-create -policy backup4h -frequency 4H -retention 5D
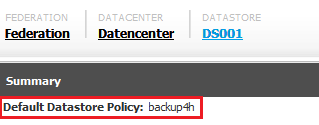
Create a new datastore
svt-datastore-create -name DS001 –size 250GB -policy backup4h
![]()
Get a list of all VMs
svt-vm-show
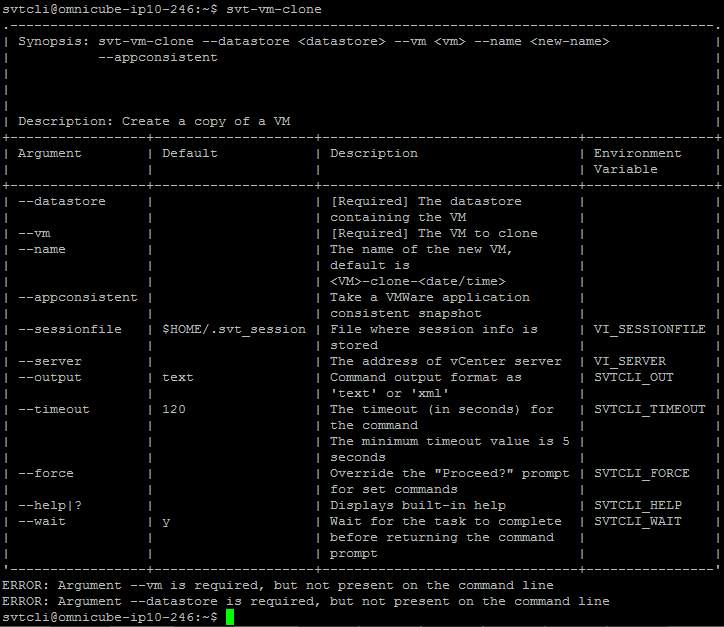
Clone an existing VM
svt-vm-clone -vm WIN7 -name WIN7-2-clone -datastore Default01
(– datastore defines the datastore, where the VM you want to clone is related)
Move VM to the new datastore
svt-vm-move -vm WIN7-1-clone -source Default01 -destination DS001 -force
Mass-commands
If you have to clone a few VMs more than one:
svt-vm-clone -vm WIN7 -name WIN7-2-clone -datastore Default01
svt-vm-clone -vm WIN7 -name WIN7-3-clone -datastore Default01
svt-vm-clone -vm WIN7 -name WIN7-4-clone -datastore Default01
svt-vm-clone -vm WIN7 -name WIN7-5-clone -datastore Default01
svt-vm-clone -vm WIN7 -name WIN7-6-clone -datastore Default01
svt-vm-clone -vm WIN7 -name WIN7-7-clone -datastore Default01
svt-vm-clone -vm WIN7 -name WIN7-8-clone -datastore Default01
svt-vm-clone -vm WIN7 -name WIN7-9-clone -datastore Default01
svt-vm-clone -vm WIN7 -name WIN7-10-clone -datastore Default01
and the move operation:
svt-vm-move –vm WIN7-2-clone –source Default01 –destination DS001 –force
svt-vm-move –vm WIN7-3-clone –source Default01 –destination DS001 –force
svt-vm-move –vm WIN7-4-clone –source Default01 –destination DS001 –force
svt-vm-move –vm WIN7-5-clone –source Default01 –destination DS001 –force
svt-vm-move –vm WIN7-6-clone –source Default01 –destination DS001 –force
svt-vm-move –vm WIN7-7-clone –source Default01 –destination DS001 –force
svt-vm-move –vm WIN7-8-clone –source Default01 –destination DS001 –force
svt-vm-move –vm WIN7-9-clone –source Default01 –destination DS001 –force
svt-vm-move –vm WIN7-10-clone –source Default01 –destination DS001 –force
If you check the vSphere Client it looks like this:
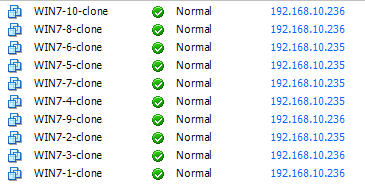
That’s it for the first part. If you have questions or need more information’s or command-snippets, let me know.
PS: Don’t forget to read my SimpliVity PoC Experience:
http://vm-up.ch/2016/12/28/simplivity-omnicube-2-node-vmware-cluster-proof-of-concept-poc/

